- Products & Capabilities

- Simulation Design & EDA

- About
- Resources
A Guide to Solder a PCB Circuit Board For Beginners


The article provides a step-by-step guide to soldering a PCB, covering workspace setup, essential tools, and safety measures. It explains heating the soldering iron, applying flux, tinning the iron tip, placing components, heating joints, applying solder, cooling, inspecting, and cleaning. Emphasis is on practice and safety for successful soldering.
An important part of electronics for any student, hobbyist, or technician is how to solder a printed circuit board (PCB). It is a process of attaching electronic components onto the PCB using a molten metal alloy called solder that creates a strong, permanent electrical bond. This article will help through the step-by-step process of soldering circuit boards for beginners.
Step 1: Setting Up Your Workspace and Tools
Before starting soldering, make sure you have a well-lit, clean, and organized workspace. Then, gather the following key tools:
Soldering iron: Preferably with temperature control and proper tips
Solder wire: Lead-free solder is recommended for health reasons
Flux: An aid in soldering; cleaning and preparing surfaces
Desoldering tools: A desoldering pump or braid will be helpful in case you need to remove solder.
Soldering stand: Set the soldering iron aside when it is not needed.
Protective Equipment: Safety Glasses, Heat Reflective Gloves
Board holder or Helping Hands: To hold the board from movement
Component leads cutters: Used to cut the excess of the leads
Step 2: Getting Familiar with the Components and the Board
Get familiar with the PCB and its components
Identify Components: Identify each component and where it goes on the board, taking note of any polarity marks or orientation requirements.
Solder Pads and Traces: Notice the layout. These are, in essence, small metal areas you will solder your components to (pads) and copper traces which comprise the connections.
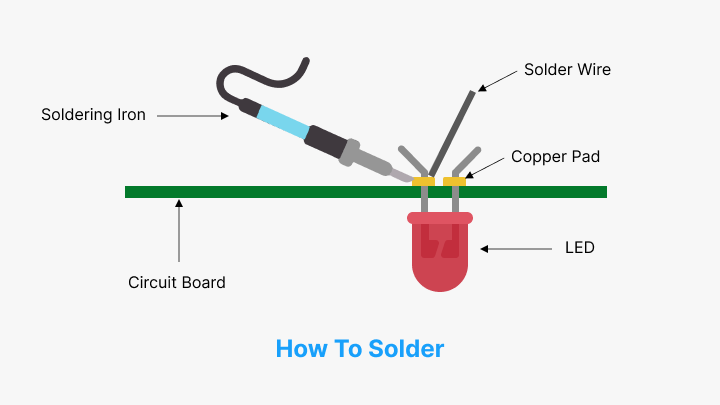 Step 3: Heating Up the Soldering Iron
Plug in the soldering iron and allow it to heat to the proper temperature, typically ranging between 350°C and 400°C then continue—662°F - 752°F. The temperature value is given by the manufacturer's instructions and component datasheets.
Step 4: Applying Flux
Apply a small amount of flux to each pad using a flux pen or brush. Flux removes oxidation and promotes better solder flow for stronger connections. Too much flux encourages unwanted solder bridges.
Step 5: Tinning the Soldering Iron Tip
Clean the soldering iron tip using a damp sponge or a brass tip cleaner. Apply a thin layer of solder to the tip, called tinning, to improve the efficiency of heat transfer.
Step 6: Placing the Components
For Through-Hole Components:
Insert Leads: Insert the component leads into the corresponding holes in the PCB. Bend the lead slightly outward from the component to keep it in place.
Flip Over the Board: The leads should now stick through the bottom side of the board.
For Surface-Mount Components:
Locate Pads: Surface-mount components are soldered on the same side of the PCB where the components are placed.
Orient and Position Component: The component is positioned over the correct pads using tweezers.
Step 7: Heating the Joint
Touch the tip of the soldering iron to the solder pad and the component lead simultaneously. Hold the tip for a few seconds so that the heat gets transferred for proper bonding.
Step 8: Applying Solder
For Through-Hole Components:
Add Solder: Touch the solder wire at the junction of the heated pad and the lead. Let the solder flow into a shiny, concave joint.
Repeat: Repeat for each lead
Clipping of Leads: Clip off excess leads near the solder joint using diagonal cutters
For Surface Mount Components:
First Solder: Maintain the component in place with the help of tweezers. Solder one lightly to secure the component.
Soldering the rest: Solder the remaining pads ensuring that each lead ends with a small, shiny solder joint.
Step 9 :Cooling and Solidifying
Withdraw the solder wire and soldering iron. Keep the component and board still for a few seconds while the joint cools and solidifies. Do not disturb the joint in process as it may develop defects.
Step 10: Inspection and Cleaning
View the soldered joints
Visual Inspection: Each joint should be smooth, shiny, and without solder bridges or cold joints. A magnifying glass may be used if necessary.
Cleaning: If you have used flux, clean the residue with isopropyl alcohol and a brush or a lint-free cloth.
Best Practices and Tips
Iron Tip Maintenance: Periodically clean the tip of the iron to prevent oxidation and to solder efficiently.
The Right Amount of Solder: Neither too much nor too little. This will provide both strong and clean joints.
Practice: Regular practice can drastically improve your soldering skills.
Safety First: Always wear protective eyewear and work in a well-ventilated area.
Conclusion
Soldering a PCB circuit board is one of the essential skills which one can acquire through repeated practice and patience. The steps given here will help you to create reliable connections for your electronic projects. From workspace preparation to understanding the components to the art of soldering—each one plays a crucial role in the successful completion of the whole process.
Hot Tags:

Contact us

If you can't find what you're looking for, please contact us.
Article
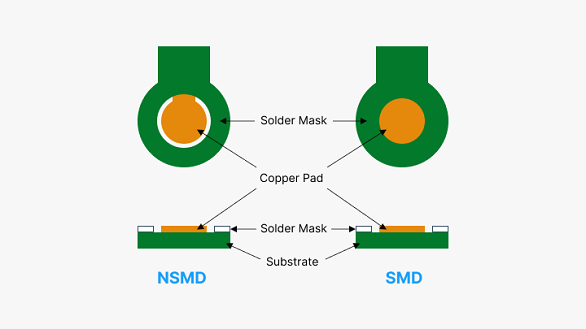
Solder masks protect PCBs from environmental damage and electrical shorts, enhancing reliability and aesthetics. The application is complex, requiring professional fabrication to ensure quality and compliance with regulations.
 2024/08/20
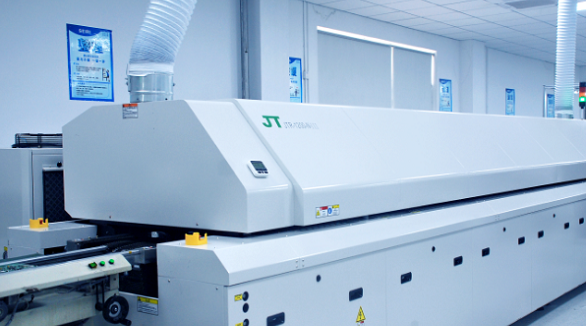
Soldering forms a very important part in the assembly of a PCB. Wave soldering is ideally applied in Through-Hole Technology, while reflow soldering in Surface Mount Technology. Wave soldering involves flux spraying, pre-heating, soldering, and cooling, while in the case of reflow soldering, pre-heating, thermal soak, soldering, and cooling steps are applied. Temperature and time control are the two most critical parameters in the above-mentioned techniques for ensuring soldering reliability.
2024/07/26
The article is developed concerning the breakthrough of integrated circuits and the need for custom PCBs in some electronic products. It enumerates ten golden rules in conducting PCB layout design and manufacturing: grid selection, routing, power layers, component placement, panel duplication, component value combination, frequent DRC, flexible silkscreen use, decoupling capacitors, and pre-production parameter checks. These rules provide for the optimum design and manufacturing of a PCB.
2024/07/25