

How to generate Gerber and Drill files in KiCAD 8?
Refer to PCBX’s capabilities for PCB manufacturing (https://www.pcbx.com/product/pcb-capability). Make sure to change the design rules in KiCAD to their parameters (smallest trace width, etc.) in order to avoid having to change the design again later on.
Creating Gerber Files:
DRC Check: Self-explanatory, to be safe conduct a Design Rule Check again to confirm that the design is free of all errors.
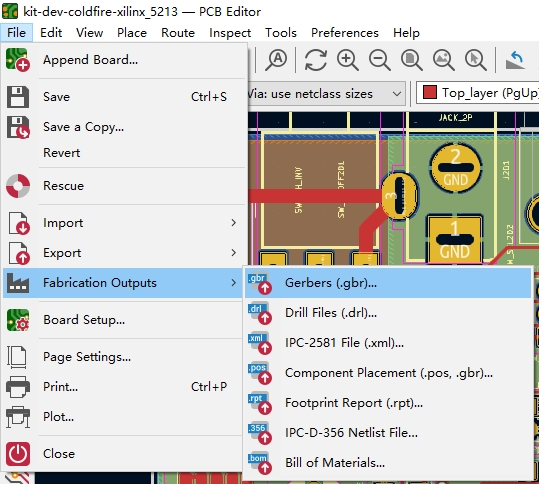
Open Fabrication Outputs: In Kicad click on File → Fabrication Outputs → Gerbers (.gbr) (refer to Figure 1).
- Output Folder: Specify a location where all the constructed files should be stored. Click Browse or type a folder name. (Refer Figure 2.)
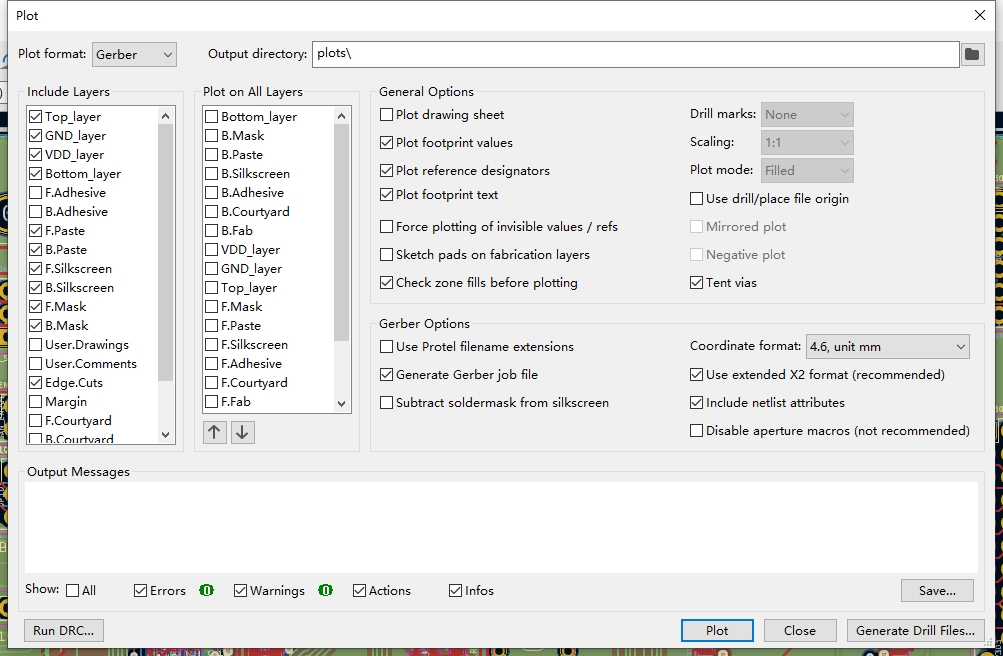
2. Layer Selection: Mark the layers required for manufacturing:F.Cu, B.Cu (Copper layers)F.Paste, B.Paste (Solder paste layers)F.Silkscreen, B.Silkscreen (Silkscreen layers)F.Mask, B.Mask (Solder mask layers)Edge.Cuts (Board outline)For 4+ layer PCBs, this will require an extra selection of inner copper layers as well (In1.Cu, In2.Cu).
3. General & Gerber Options: Check the following boxes: Show reference designators on the plot. Show footprint text on the plot. Fill zones before the plotting and check on it. Provide tenting for vias. Pro tel Supported File Extensions. Exclude solder mask from the silkscreen.
4. Plot Files: To do this, click the “Plot” button located at the bottom of the screen. The Gerber files will be generated and saved in a folder that you have selected.
5. Verify Files: Do not upload any files unless you have checked them with a 3rd-party Gerber viewer for any possible mistakes (in board outline, drill holes, silkscreen, etc.). There are things fixed that need to be fixed before uploading.
Generating Drill Files:
- When it comes to generating Gerbers the “Plot” window remains open, click the “Generate Drill files…” button.
- Drill File Options: Chose these parameters: Use alternate drill mode for “Oval Holes Drill Mode” Absolute for “Drill Origin” Millimeters for “Drill Units” Decimal format for “Zeros Format”
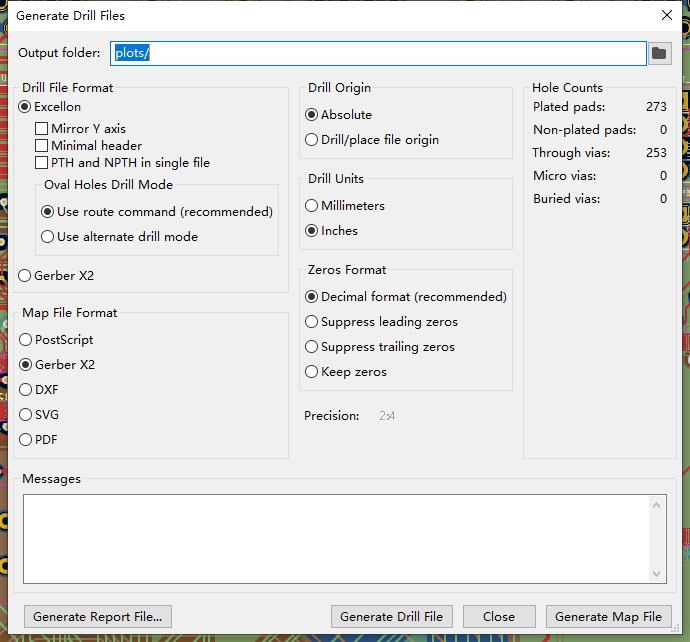
3. Generate Drill Files: To do this Click the “Generate Drill File” button. These files will be saved in the same folder as your gerbers.
Generating Drill Map (Optional, Recommended):
- Click on the “Generate Map File” button in the same window. This is also helpful when looking for information since it adds more information to help the reader.
Uploading to PCBX:
- Zip the folder with your Gerber and Drill files in it.
- Upload the zipped folder to the PCBX Website for production.
Additional Notes:
- It is advisable to use the PCBX Manufacturing Capabilities link for general information only. A more realistic perspective of PCBX´s abilities must be obtained.
- This tutorial is for KiCAD 8.04. Some minor differences may occur in some of the slightly different versions.
- Don't forget: check your files very thoroughly before the upload itself.